
Light Trails 101: Long Exposure Basics for Evening Streets
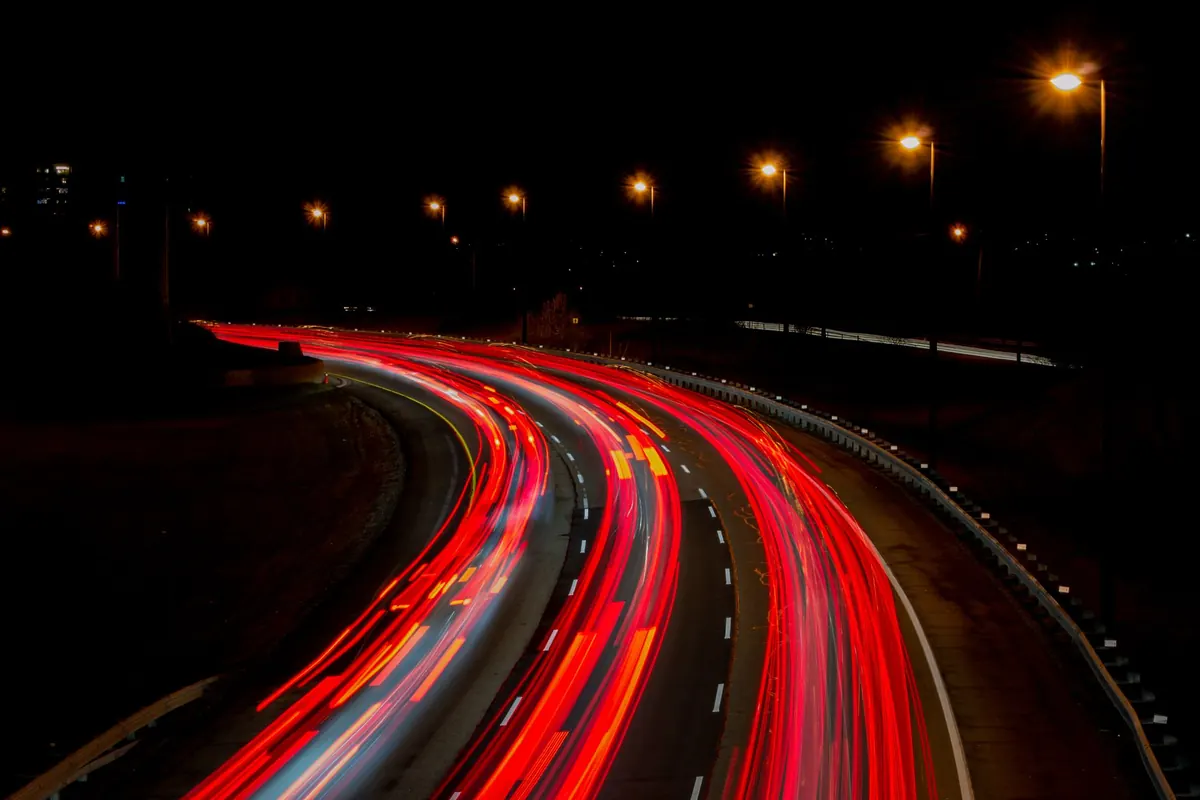
By nine o'clock on a wet Tuesday, most city streets have turned into a slow river of red and white. Brake lights smear, headlights stretch, and the tarmac looks painted rather than driven on. Your eyes never see this. They take light in moments; a camera with the shutter held open keeps collecting, so a car that crossed the frame in half a second leaves a line behind it.
The technique is not difficult. You need a camera with manual controls — most phones count — a tripod, and a road with traffic. The rest is judgement: how long to hold the shutter, where to stand, and what to leave in the frame beside the moving light.
Why the trail appears
A photograph records everything that happened while the shutter was open, added together. Hold it open for five seconds and every bright thing that moves during those five seconds paints a continuous line; everything that stays still stays sharp. Hence the two conditions: a long exposure, and darkness deep enough that the traffic lights outshine their surroundings. Try the same shot at midday and the cars simply become part of a bright, blurred mess.
Direction matters. A car crossing left to right in front of you draws a long, clean streak. A car driving away compresses its own lights into a short smear. For bold lines, stand side-on to the traffic. For something quieter — a road receding into the distance — move back and let the trails converge.
Shutter speed: where to start
Shutter speed alone decides how long a trail is. Aperture and ISO decide how bright everything else is. Reliable starting points for a city street:
- 1–2 seconds — tight scenes, a single vehicle, or ambient light still strong enough to blow out a longer exposure.
- 4–8 seconds — the middle ground. One or two vehicles cross and the trails read as lines rather than fog.
- 10–20 seconds — junctions and roundabouts, where you want trails layered on trails.
- 30 seconds and beyond — quiet roads, or making pedestrians disappear. Long exposures warm the sensor and add noise, so check the result before committing.
Watch for gaps. If traffic thins mid-exposure you get a dark break in the line, which looks accidental. Time your shutter so a vehicle is already moving through the frame when it opens, or cover the lens with a black card during the quiet moments and uncover it when the next car arrives.
Tripod setup and the small things that ruin frames
Handheld light trails are not a thing. A tripod is the one piece of kit that matters, and how you use it matters more than which one you bought. Extend the legs rather than the centre column, splay them wide, and keep the rig low if the spot is exposed to wind. Hang your bag from the hook underneath for weight. Take the strap off, or loop it so it cannot catch the breeze.
Then the settings. Turn image stabilisation off — it corrects your hands, and on a locked tripod it can introduce its own drift. Use a cable release, or the two-second self-timer. On a DSLR, lock the mirror up if the camera allows it, and cover the viewfinder eyepiece so stray light cannot leak in. Check the quick-release plate is tight. And remember that pavements vibrate: footsteps, buses and roadworks all travel through the ground, so if a frame looks soft for no obvious reason, wait for the bus to pass.
Exposure settings
Set ISO to its lowest native value, usually 100, and choose an aperture between f/8 and f/11 — sharp, with useful depth, and small enough that streetlamps render as neat stars. At f/16 the stars are more pronounced but the whole frame softens through diffraction, so it is a trade rather than an upgrade. A moderate wide-angle, roughly 24–35mm on a full-frame camera, suits most corners; a longer lens compresses a receding road nicely.
Shoot raw so you can shift white balance later, because street lighting mixes sodium, LED and fluorescent sources and no single setting flatters all three. Take one test frame and check the histogram for two things: that the sky and buildings are not blown out, and that the brightest lamps, which will clip, are not turning the trails into white mush. Adjust the shutter, not the aperture, to fix brightness. If your camera offers long-exposure noise reduction, note that it doubles your waiting time by shooting a second, dark frame; plenty of photographers switch it off and deal with noise later.
Composition on a dark street
A trail on its own is just a bright squiggle. What makes the photograph is what sits beside it. Give the eye an anchor — a lit shopfront, a bridge, a doorway, a figure waiting at a crossing. Wet roads help enormously, doubling every line and adding colour where there was none. Blue hour, the twenty minutes or so after sunset when the sky still holds detail, usually beats full dark, because the buildings keep their shape and the trails have something to sit against.
Position matters more than gear. An elevated view from a bridge or a multi-storey car park separates the trails from the road and turns them into sweeping curves. A low angle at the kerb gives drama and scale, provided you stay well clear of traffic. Junctions and bends give the lines shape; long straights pull the eye in. Work horizontally for traffic crossing in front of you, and try a vertical frame when the road runs towards you. Watch the edges for clutter — bins, signage, a bright shop sign in the corner — because every competing light steals attention from the trail.
One safety note, since this involves standing near roads after dark: wear something visible, keep your bag zipped and close, and never step into the road for a better angle. Drivers at night are not looking for a person crouched beside a tripod.
When it does not go to plan
Buses are the enemy. One stopping at a bus stop sits in frame for the whole exposure, burning a bright rectangle into the middle of your careful curve. Flare is the other common problem: a streetlamp just outside the frame can wash the picture with veiling haze, so use a lens hood and keep the front element clean and dry. In cold weather batteries fade quickly — carry a spare somewhere warm, and let the camera acclimatise after leaving a heated car, or condensation will soften every frame until it clears.
A routine that works
- Arrive at blue hour rather than after dark, so you can see your position and the sky still has colour.
- Walk the location before setting up. Note the kerbs, the puddles, and where the light falls.
- Set the tripod low and level. Stabilisation off, strap removed.
- Start at ISO 100, f/8, manual mode, five seconds.
- Take a test frame, check the histogram, then adjust only the shutter speed.
- Shoot variations — two, five, ten, twenty seconds — from the same spot. This teaches more than tweaking one frame.
- Review at home on a proper screen, not on the back of the camera in the cold.
That last point deserves emphasis. Light trails almost always look better on a large screen than on a camera's LCD at eleven at night, and the frames you are tempted to delete in the field are often the ones with the best movement in them. Take more than you need, keep the raw files, and return to the same corner another evening. Streets repeat themselves, and the second visit is usually the one that produces the picture you had in mind.
Photo: Mian Rizwan / Pexels